Introduction
Negative staining is one of electron staining techniques. In Negative staining technique, an acidic stain such as Nigrosin, India ink, Eosin or Congo red is used in which the bacterial culture or the specimen is mixed well and then spread over the Microscopic glass slide to form a thin smear.This technique leaves heavy metals at the gaps in a specimen and on the supporting film at the surrounding regions of the specimen.
Negative staining enables enhancement of the TEM image contrast. An aqueous solution of viruses or purified proteins, etc. is dropped onto a supporting film, and then excessive water is removed from the specimen with a filter paper. Immediately after the removal of excessive water, a staining solution containing heavy metals (uranium acetate, phosphotungstic acid, etc.) is dropped onto the specimen. Then, water is removed from the specimen with a filter paper to dry the specimen, leaving the heavy materials at the gaps and on the supporting film at the surrounding regions of the specimen. As a result, these regions appear dark due to strong scattering of incident electrons, and the morphology of the specimen is elucidated. Since the specimen itself is not stained, this technique is termed “negative” staining.
Principle
Negative staining is based upon the principle that there is no reaction between the stain and the specimen. This is accomplished when the stain is used at a pH at which the interaction between stain and biological materials is negligible.
In this technique the particulate or colloidal components are examined directly on a TEM specimen support grid after they have been surrounded or embedded in an electron-dense ‘stain.’ The technique relies on the metallic stain producing an outline of the structures, rather than reacting positively with them, thus providing information on overall size and shape and detail of features such as bacterial flagella. The electron beam passes through the specimen due to its low electron density, but not through the metallic background, producing an image of light specimen surrounded by dark background.
Phosphotungstic acid (PTA) is one of the negative stains used most commonly, although some success has been achieved with uranyl acetate, particularly for the examination of food protein macromolecules. A third reagent, ammonium molybdate, has been used, but with less predictable results, and has been shown to be particularly sensitive to localized pH changes.
Negative staining allows the determination of morphology and structure of subcellular components (e.g., nuclei, ribosomes, and membranes) and isolated macromolecules (e.g., DNA and protein molecules), based upon the penetration of stain into the holes and crevices of biological molecules that imposes the structural information onto the stain.

Negative Staining Protocol
Material And Reagents Required
- Microscopic glass slide
- Inoculating loop
- Microincinerator or Bunsen burner
- Staining Rack
- Wash bottle
- India Ink / Nigrosine
- Microscope (with 100X objective lens)
Procedure Of Negative Staining Technique
Method 1
- Take a clean, Dry, Scratch and Grease free Microscopic glass slide and place a drop of India ink or Nigrosin on it at one end near the edge.

- Take a small portion of the bacterial colony with the help of sterilized Inoculating loop.
- Mix well the culture with dye taken on the Glass slide.
- Now, take another Microscopic Glass slide, place it near to the specimen-dye mixture at an angle of about 30° – 45°.
.
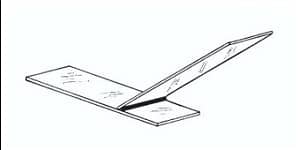
Move the slide toward the drop of the specimen-dye mixture until the contact is made with the drop at the specific angle. Then move the spreader slide smoothly and rapidly forward over the specimen slide, drawing the dye mixture behind it into a thin film.

Method 2
Take a drop of nigrosine or India ink and place it in the middle of the Clean & Grease free Glass slide.
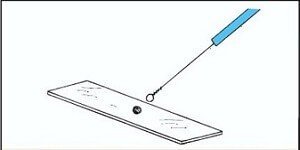
Now, with the help of Sterilized inoculating loop transfer a small portion of the specimen to the slide containing a Drop of Dye.

Mix well the Specimen with the Dye using the sterilized straight wire and spread evenly over an area of about 1 – 2 cm.

Allow the smear to Air dry and then observe under the microscope at High power objective (45X) and oil immersion (100X) objectives.

What You Need To Know About Negative Staining
- In Negative staining technique, the stain is applied to the background and not to the bacterial cells, so after drying there is no need of washing step and the slide is directly observed under oil immersion objectives (100 X).
- Heat fixation step is generally avoided because heat fixation can alter morphological characters of the bacterial cell, melt the capsule or slime layer and distorts the actual morphology.
Negative Staining Observation And Result Interpretation
In Negative staining Preparations, the Bacterial cells observed as the Clear transparent bodies or objects, may be of variable size and shape if you are using a mixture of bacteria, against a dark background.

Uses Of Negative Staining
- It Is used in microbiology to study the morphological characters of cell that includes the size, shape, and arrangement of bacterial cells without distorting their actual characters.
- It is important in observing the bacterial cells that are difficult to stain by other staining techniques. For e.g. – Spirillum, Spirochetes etc.
- It is also useful in observation of bacteria capsules.
Further References
- Clinical Microbiology Procedure Hand book Vol. I & II, Chief in editor H.D. Isenberg, Albert Einstein College of Medicine, New York, Publisher ASM (American Society for Microbiology), Washington DC.
- A Text Book of Medical Mycology. Editor: Jagdish Chandar. Publication Mehata, India.
- Text book of Diagnostic Microbiology. Editors: Connie R. Mahon, Donald G. Lehman & George Manuselis, 3rd edition2007, Publisher Elsevier.
- Mackie and Mc Cartney Practical Medical Microbiology. Editors: J.G. Colle, A.G. Fraser, B.P. Marmion, A. Simmous, 4th ed, Publisher Churchill Living Stone, New York, Melborne, Sans Franscisco 1996.
- Bailey & Scott’s Diagnostic Microbiology. Editors: Bettey A. Forbes, Daniel F. Sahm & Alice S. Weissfeld, 12th ed 2007, Publisher Elsevier.
- Medical Mycology. Editors: Emmons and Binford, 2nd ed 1970, Publisher Lea and Febiger, Philadelphia.
- Rippon’s JW: Medical Microbiology. The pathogenic fungi and the pathogenic Actinomycetes. 3rd ed 1988 Publisher WB saunder co, Philadelphia.
- Practical Laboratory Mycology. Editors: Koneman E.W. and G.D. Roberts, 3rd ed 1985, Publisher Williams and Wilkins, Baltimore.